From local to public with ngrok
For years I had played with server-side apps locally, running and testing it on my machine and not showing it to the world, since, you know…it would take me some extra effort to deploy it somewhere. However, everything changed when I got to know about the wonders of ngrok. It works like magic.
It’s not my intention here to anylize ngrok’s key features since its own documentation and this amazing article by Phil Nash cover it all thoroughly (by the way, if you’re a Windows user, check this one by Devin Rader), but I can show you a basic usage, so you can get it up and running in seconds.
Running ngrok on Terminal
Since it’s built in Go and packaged as a binary, the downloaded file is a Unix Executable (Mac) and you run it passing http and the port (80 by default) as arguments. On Terminal:
./ngrok http 80What happens next?
Easily sharing a public URL
So considering this website (my own), when I use jekyll serve, Jekyll automatically serves it on port 4000 (default), so I can access it locally through http://127.0.0.1:4000. In case I write a new blog post or change something on it and want to show it to someone, with ngrok I can specify the port (./ngrok http 4000) and it’ll generate the link for me (you can also set a password, check Phil’s article):
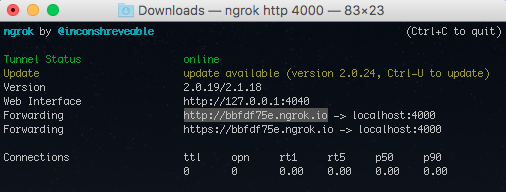
Now you use the public link URL http://bbfdf75e.ngrok.io, which will tunnel whoever you shared it with to http://127.0.0.1:4000.
You can already see the beauty of it: in my case, no need to push my modifications anywhere in order to show what I’ve been working here to someone. If you’re developing an application on your machine and need to show progress to a client but couldn’t bother deploying it, now you’re good to go. Kudos, Alan Shreve!!